Sunday, 7 October 2012

Génoise sponge and a week of chocolate!

It's Sunday and we have just finished having our roast chicken with veggies, we went off piste and had cous cous instead of roast potatoes! Controversial I know, but we wanted to keep it light....well leave room for dessert.

I have been itching all week to bake and when Saturday came, I went to the shops in search of Matcha Green Tea powder. One of our local health shops did not disappoint, although at £18.00 per pop I will be using it rather sparingly! My boyfriend's face was a picture when he saw the receipt....whoops:0)

The tin is smaller than a small Green Giant corn tin!!

I have been wanting to make a Genoise ever since I have been watching the GBBO and I had a recipe in mind when I bought this. You can find the recipe here Matcha- Almond Génoise Layer Cake.

The recipe doesn't call for mixing the egg and sugar in a bain marie but instead mixing yolks with icing sugar until the mixture has gone really pale. Génoise sponge recipes don't use any chemical help to rise and it's all meant to be up to the poor little eggs in the recipe. Therefore this recipe involves whipping the egg whites separately until you get stiff peaks, like a meringue. Then you incorporate it with the yolks+ icing sugar mixture.

The mixture did not look pretty.
Nor did the sponge......
But the final product looked good, I'm a bit annoyed because somewhere between the picture below and the living room I managed to forget to take a picture of a slice of the cake. I also skipped the white chocolate mixture and went with whipped cream because Strictly Come Dancing was starting!


It was delicious and there are sceptic green tea people out there whom I don't blame, but there is no bitter taste and the almond goes really well with it. The best part is there is NO fat.

This week is CHOCOLATE week, it must surely be one of the better weeks out there. So I decided to kick start the week, yes on this week's Sunday, by using my cupcake moulds and make tiny desserts for tonight.


These are pretty wonderful cakelets with swirled whipped cream. They are sat in a puddle of chocolate ganache:0)

Hope you indulge in as much chocolate this week as I will! Ciao!x


Monday, 1 October 2012

A meal to remember (second post)

My lovely friend James took me out for a birthday treat the other week to a handsome (yes, I am using the word handsome to describe a place) restaurant called The Delaunay. I felt compelled to write a short post about it. This restaurant has an old fashion cool about it and the dark wooden interior with the silver plated cutlery just tops the look off. It was so cool that I was too scared to take more than one picture. The reason for the picture was the dainty bread on the table, a bread I have tried to make in the past;
Pain D’epi
For starters I had the Romano peppers stuffed with spiced aubergine and James had Tarte Flambee with smoked bacon and shallots. For mains I had Mackerel and James had Cordon Bleu Schnitzel with mash and greens. It was delicious and I'm delighted to have been taken there.

To top the evening off, we went for a drink at The Waldorf Hilton next door and I also got a lovely gift which I have yet to try out.
Adorable! Thanks James.

Seeing and eating the Pain D’epi reminded me of last Christmas, I made a Swedish Jul Bord for my boyfriend and his family. I had just seen Lorraine Pascale make the bread and thought let's give it a try! The bread didn't turn out amazing but looked the part....
Köttbullar, prinskorvar, skinka, leverpastej, ägg med citron majonäs, potatis and rödbetssallad plus some salad.


I can't wait for Christmas so we can spend time with our loved ones and eat lots of delicious food.

Here is to a white winter! x


A week full of events!

Since the national cupcake week I have been so busy that I had no time to update my blog:0(
I managed to make a second batch of cupcakes, they were yummy Hummingbird Bakery red velvet cupcakes;


They were pretty delicious but I didn't manage to get the colour just right this time. I'm not sure if liquid colour suit red velvet recipes better than gel. I'm going to try it with the liquid colouring next time.

The best part of that week was that I made a celebration cake called Prinsess Tårta/ Princess Cake, this is a cake first made by Jenny Åkerström back in the early 1930s. The cake was called "Grön tårta"/ Green cake (due to the green marzipan "lid" on the cake), but since the Swedish princesses liked it so much they changed its name to Princess Cake. Now there are a lot of disputes regarding what was originally in the cake and whether the additional ingredients jam and cream have turned this cake into something called "Opera Cake". I personally will always call it Princess Cake and will forever associate it with any celebration occasion we had back home in Sweden as there was rarely a birthday, anniversary or graduation without a Princess Cake on the table. I guess this is were my love for cakes come from.

The recipe is quite straight forward (the source is Sju Sorters Kakor);
4 eggs
170g sugar
60g plain flour, sifted
60g potato four (not starch, I found this at a health food store), sifted
2 tsp baking powder

I made twice the amounts because I wanted decent sized layers.

Preheat the oven to 150c fan

This recipe requires a 26cm diametre cake tin, start by preparing the tin with butter and grease proof paper.

Mix the eggs and sugars until light and fluffy.
Add the flours and the baking powder.
Mix gently until incorporated and pour into the tin (the mixture is very liquidy unlike normal sponge cakes), put it into the oven for circa 40 minutes but do check after 30 minutes.


The filling is straight forward if the custard is shop bought but can also be made if you have time. Just make 200ml of your favourite custard recipe and add 4 gelatin leaves for it set. I skipped the gelatin part as I rather not have it if I can avoid it.

I used reduced raspberry sugar, 2/3s of Waitrose's Madagascan's Vanilla bean custard and a large tub of double cream+ 100ml extra in case.

Be GENEROUS with the jam!
First layer is simply raspberry jam. For the second layer, I whipped 100ml of the double cream to the point it was pretty thick and mix it with the 2/3s of the custard. You can do more but I was scared it wouldn't set! Once done, whip up about another 150ml and ice the cake.

Put the third layer on the iced cake and fridge it fully covered!
It's important to do the top layer on the same day as you are going to eat it, otherwise the marzipan goes too soft from the cream underneath. You can prevent this with a tiny bit of buttercream spread on the marzipan lid before putting it on the cake but that's faffing around a bit too much in my opinion. Plus, this cake should be consumed, fully, on the day it's made :0)


 The last part is to smother the cake with whipped cream and ensure that you create a dome-esque form on the top.


I made some tiny flowers to cover up a fold I could not get rid of!

I had some marzipan already in yellow and decided to use that, I wouldn't recommend rolling marzipan out like I did. It's hard work if you are pressed for time and I rolled it out 24 hours before hand to let it "sweat", although it was wrapped up properly. Use the rolled out ones and save yourself some time.


Dust the cake with icing sugar and add your decoration. This cake is just amazingly tasty and light. We had it for breakfast with a rather large Magnum of champagne which made it a great start for our 30th birthdays! Puss och kram to my family who unfortunately weren't there.

That weekend we also visited Denbies Vineyard for a train tour around the vineyard with an English sparkling wine tasting with canapes at the top of a hill. Excuse the poor quality photos.

This was on the way up, it felt like we were in France or Italy, minus the sun!

On the way down, it was beautiful and very romantic. I manage to have three glasses of Denbies' finest!
It was very chilly.... but our three course meal warmed us right up!
The weekend also included a trip to Tower of London which was great. I didn't manage to take a lot of pictures but I liked this view because it showed how diverse London's skyline is, mixing old with new. Awesome!
 
 Hope you have enjoyed this post which is somewhat a short novel:0)

Ciao! x


Tuesday, 18 September 2012

National Cupcake week!

I have been meaning to post this earlier today but I got distracted with yoga and then watching the Great British Bake Off. I was so pleased that they let everyone through to next week!! But I felt so sorry for John:0(

My first cupcake recipe for the National Cupcake week is a flavour which I have been wanting to make for ages but I have been worried that the hype might not be live up to it...... The flavours are Chocolate and Peanutbutter!! Two of my favourites so they better not let me down!

I wanted a chocolate cupcake which was dark and moist, I looked through my books but couldn't find anything exciting. I checked one of the websites I go to for recipes and came across a lovely recipe from Joy of Baking.
This recipe yields 16 cupcakes but I filled 12 cupcake cases and didn't have much left.

Preheat the oven to 190c

Ingredients
50g cocoa powder
240ml freshly boiled water

175g all purpose flour
2 tsp baking powder
1/4 tsp salt
113g butter (rum temperature)
200g golden caster sugar (or normal white caster sugar
2 large eggs
2 tsp of vanilla extract

Line your cupcake tin with cases.
Boil 240ml of water and mix with the cocoa powder, set aside to cool.

Mix the flour, baking powder and salt together, set aside for later.
Cream the butter and sugar until light and fluffy, mix in the eggs until well mixed. Add the vanilla extract and then mix in the flour until just incorporated. Pour in the chocolate mix until smooth. Be sure to beat the chocolate mix before pouring in as a lot of it might sit on the bottom.
Bake for 16-20 minutes, I check with a tootpick after 20 minutes and it came out clean.
The mixture was really liquidy so I had to pour it in rather than "ice cream scopping it".

Uhm, yeah so I DID have one before I managed to take a picture:0) Yum!

I used a different peanut butter frosting because I was looking for something which used whipped cream or cream cheese. I felt that an icing with just butter, peanut butter and icing sugar would be too heavy. I found this delicious recipe from Bakers Royale.

Ingredients
110g icing sugar
177g of peanut butter
70g butter (room temperature)
1/4 tsp vanilla extract
78ml double cream (I used 100ml)

Whip the double cream in a separate bowl and set aside.
Mix the rest of the ingredients with the paddle attachment and beat on a medium speed until incorporated.
Fold the peanut butter mix into the whipped cream until well combined.

I used the bag of mini Reese's I bought the other week to top the cupcakes off! 

 
Try stopping yourself from eating these mini Reese's......

This baby is mine!

This flavour combination is pretty darn good and I have to give some away in order to prevent myself from eating them all! I just regret one thing.....and that is not bringing myself to make them sooner!

Ciao!x

Sunday, 16 September 2012

More S'mores please!

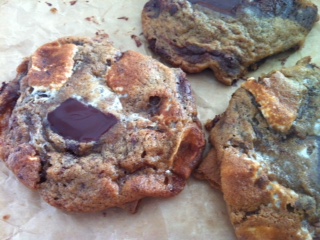
I was browsing a few blogs when I came across S'more cookies and OH MY GOD do they look good. I have wanted to make them for ages now so when we went to Hatchland's Park last week we made a detour on the way home via Guildford to visit an American goodie shop. The recipe called for Graham Crackers and these are not available in normal English shops but luckily they had them in the Stateside Candy Co Shop. These crackers have been somewhat of a mystery to me, US bloggers use them in American cheesecakes and when you google what they taste like there are loads of websites with debates regarding whether they taste like digestives or not....Needless to say I was pleased to find them and didn't have to find a replacement!


I love the big goodie bag!! I had to sneak in a small bag of m&m's peanut butter and mini Reese's for my chocolate peanut butter cupcakes.

For the S'mores I adapted a recipe fromThe girl who ate everything;

Preheat the oven to 180c

Ingredients
155g butter (room temperature)
205g packed dark brown sugar (I have had a pack sitting in my baking cupboard but you can use light brown as well
110g golden caster sugar
2 large eggs
1 tsp vanilla extract
230g all purpose flour
1 tsp baking powder
1 tsp cinnamon
1/2 salt
24 Graham Cracker squares

Depending how chocolatey and marshmallowy you want your S'mores;
150g of dark chocolate
Half to a pack of mini marshmallows

Mix all the dry ingredients together (flour, baking powder, salt, cinnamon)
In a standing mixer, cream the butter with the sugars. Once done, add the eggs and vanilla extract followed by the flour mix on low speed. Despite using dark sugar my mixture was very light and fluffy;

 Christy's recipe (and most recipes) call for Hershey's chocolate but I went with what I had which was Green and Black's 70% dark chocolate. I didn't have the energy to go out and get Hershey's plus I LOVE G&B's chocolate. Almost as much as Marabou chocolate.
I used my rolling pin to break the chocolate bar into small pieces and folded them along with the marshmallows into the mixture. I then spooned them onto the cracker squares.

I was a bit generous with my portions but I think you can easily do more than 2 dozens of these.
Bake for 5 minutes, meanwhile break up the rest of the chocolate you have into their own squares, take the cookies out and push a square into each cookie. Bake for another 5-7 minutes. I took mine out after 5 minutes because I didn't want them to brown more or worse, burn!

I haven't had any cookies for ages and these were so nice that I never want to buy one ever again. Proof that homemade delights are always so much nicer than shop bought.


We had two each whilst warm and they were delicious. The different textures of the cracker and the gooeyness of chocolate and marshmallows are great.

These will be the perfect film snack (bribe) for when I force my boyfriend to watch the Audrey Hepburn DVD box set he bought me:0)

Don't forget, this week is National Cupcake Week! So plenty of posts to come.

Ciao!x

Thursday, 13 September 2012

A not so New York cheesecake.....

Although I have never been to New York and can't for sure say that I have tested a real New York cheesecake, I can definitely say that a creamy vanilla cheesecake is one of my favourites. I used to love the ones they did in Waitrose at their bakery counter but I think they have changed; they used to have a bready textured base rather than digestive-y.

I first came across Japanese cheesecake via Sprinkle Bakes Cotton Soft Japanese Cheesecake; it looked so fluffy and delicious. Although I find baked cheesecakes daunting, I made one once which I forced my boyfriend and his family to test, it never rose and it was very heavy. I decided to be brave and make this one purely because it looks so nice!

Sprinkle Bakes recipe has been converted to American measurement but she helpfully added the original recipe from Diana's Desserts. I took the measurements from Diana's website and Sprinkle's directions. Both recipes call for cake flour which I haven't found, so I researched about it and found that McDougalls' supreme sponge flour had the same protein levels as cake flour. Although it is self-raising flour, which I don't think cake flour is, I still went ahead with it.

Definitely cover your cheesecake with aluminium foil to stop it from browning, I didn't because it would have hit the ceiling of my oven but I will adjust that next time.
Mine had no lemon juice in it but I am tempted to use Matcha green tea powder in the recipe next time, I think it would taste great.


Once baked, I left it alone to cool (as hard as that was!) and then gently removed the spring-form pan sides along with the greaseproof paper. When it completely cooled I put it in the fridge overnight.
 
Although the cake is great on its own I had it with some blackcurrant curd I bought from a National Trust shop, which went beautifully with it. I served it up with some jasmine green tea.
I would definitely recommend this cake, it's so light and yummy!
 
Ciao! x


Tuesday, 11 September 2012

A very berry pie indeed!

We spent last weekend enjoying the gorgeous weather, we cycled down to Hatchlands Park via some debatable routes...We were almost trampled by the cows roaming free in the park whilst sunbathing and we enjoyed a few drinks at our local pub and the German restaurant.
Try to prevent any guy from ordering one of these beers! One litre!?!
Afternoon snack with Aspall cyder, it was very tasty!
 As the weather was so warm, I was dying to try out my new ice cream machine. Unfortunately I have no pictures as this was done in the evening and a combination of bad light plus exhaustion meant that I wasn't thinking straight. I wanted to try out a recipe which was fairly straight forward as it was my first time. I used this BBC Good Food vanilla ice cream recipe, I won't rewrite the recipe here as I followed it exactly so no changes to add. It did take my machine more than 2 hours to churn it though, not sure if the mixture had cooled enough.
Obviously you can have ice cream on it's own or if you like to make things complicated then you make a big berry pie...


I used a Mary Berry recipe for the shortcrust pastry and doubled the ingredients;
350g plain flour
30g icing sugar
150g diced butter
2 large egg yolks
2tbps cold water

I sifted the flour and icing sugar together, added the cold diced butter and rubbed it together to get the breadcrumb consistency.
I then added the yolks and water to bring it together. Once it has formed into a dough, I wrapped it in a cling film and put it in the fridge. Once it had chilled I rolled it out on a well- floured surface.

I used a spring-form pan so it was a bit awkward getting the pastry into the form but after a bit of gentle manoeuvring and patch work I was there! I pricked the pastry and blind baked it for 15 minutes in a pre-heated oven. The temperature was on quite low as I didn't wish to burn the pastry, it was set to 100c. I then baked it without the baking beans for about 5-7 minutes until golden brown

Whilst it was baking I prepared my filling, I used 450g of frozen mixed berries, thawed of course, and 300g of fresh blueberries. Yes, that's a lot of berries...
I mixed 3 tbsp of cornflour with 50g of sugar and mixed it into the fruit. I wanted my fruit to remain quite tart as the pastry and ice cream would be sweet enough.

I also sprinkled a bit of cornflour and sugar at the bottom of my pastry case once baked. I filled the case with all the berries and laid the "lace" (I ran out of pastry to make it thicker!). I then baked it for another 30 minutes but kept an eye on it.
The end result was yummy, I left it to cool and we had it with some of my delicious ice cream.


My inspiration for this was Heather's Deep Dish Berry Pie Tart, hers is absolutely gorgeous. I will attempt this again so I can get the laces right and possibly add more berries...
 
I'm having another piece now to celebrate Andy Murray's first grandslam! Well...any excuse to have more pie :0)
 
Ciao! x